Home · DIY · First Timer
I Poured My First Concrete Slab in One Saturday — Here's Exactly What Happened
My shed had just been delivered — boxes in the driveway, ready to assemble. Only one thing missing: I needed a solid concrete slab to put it over and anchor it. I had zero concrete experience, blocked my Saturday schedule, and a lot of internet rabbit holes ahead of me. Here's the real version of how it went.
The shed had just been delivered. Sitting in my driveway in boxes, ready to assemble — but I couldn't touch it until the slab was done. The delivery company was clear: level, solid surface. The specs said 7 feet by 3.5 feet, at least 4 inches deep. I had never poured concrete in my life. I've done tile, framing, painting, plumbing repairs. But concrete? That was always on the "call someone" list.
I decided not to call someone. The slab was small enough that this felt doable — and honestly, my anxiety needed to see that shed assembled and full of tools as fast as possible. That was the real pressure. So I spent one evening planning it out, bought everything, and blocked my Saturday. This is the honest account of what that looked like.
What I Bought (and Why)
Before anything else, I made a materials list. For a DIY concrete slab at this scale, you need more than just bags of concrete. Here's what I ended up purchasing:
Full Materials List — 7×3.5 ft Slab, 4″ Deep
- ~24 bags of 50 lb High Strength Concrete (Quikrete or equivalent)
- 5 bags × 50 lb gravel (base compaction)
- 2 × 2x4 boards, 8 ft each (for the form frame)
- 2½" wood screws (for assembling the form corners)
- Steel wire mesh, 3.5×7 ft (found pre-cut at Lowe's — lucky)
- 18 polypropylene rebar chairs (1.5″ height)
- Mud mixer drill attachment
- Concrete edger
- Concrete finishing trowel
- A garden hose nearby (for curing, not mixing)
The 50 lb bags were a deliberate choice over 80 lb. On a 4-inch slab measuring 7×3.5 ft, you're looking at about 8.2 cubic feet of concrete — roughly 22 to 24 bags of 50 lb. I knew mixing those alone would be a workout, so I didn't want to wrestle 80-pounders on top of it. Even so, "not easy" turned out to be an understatement.
Step 1 — Building the Form
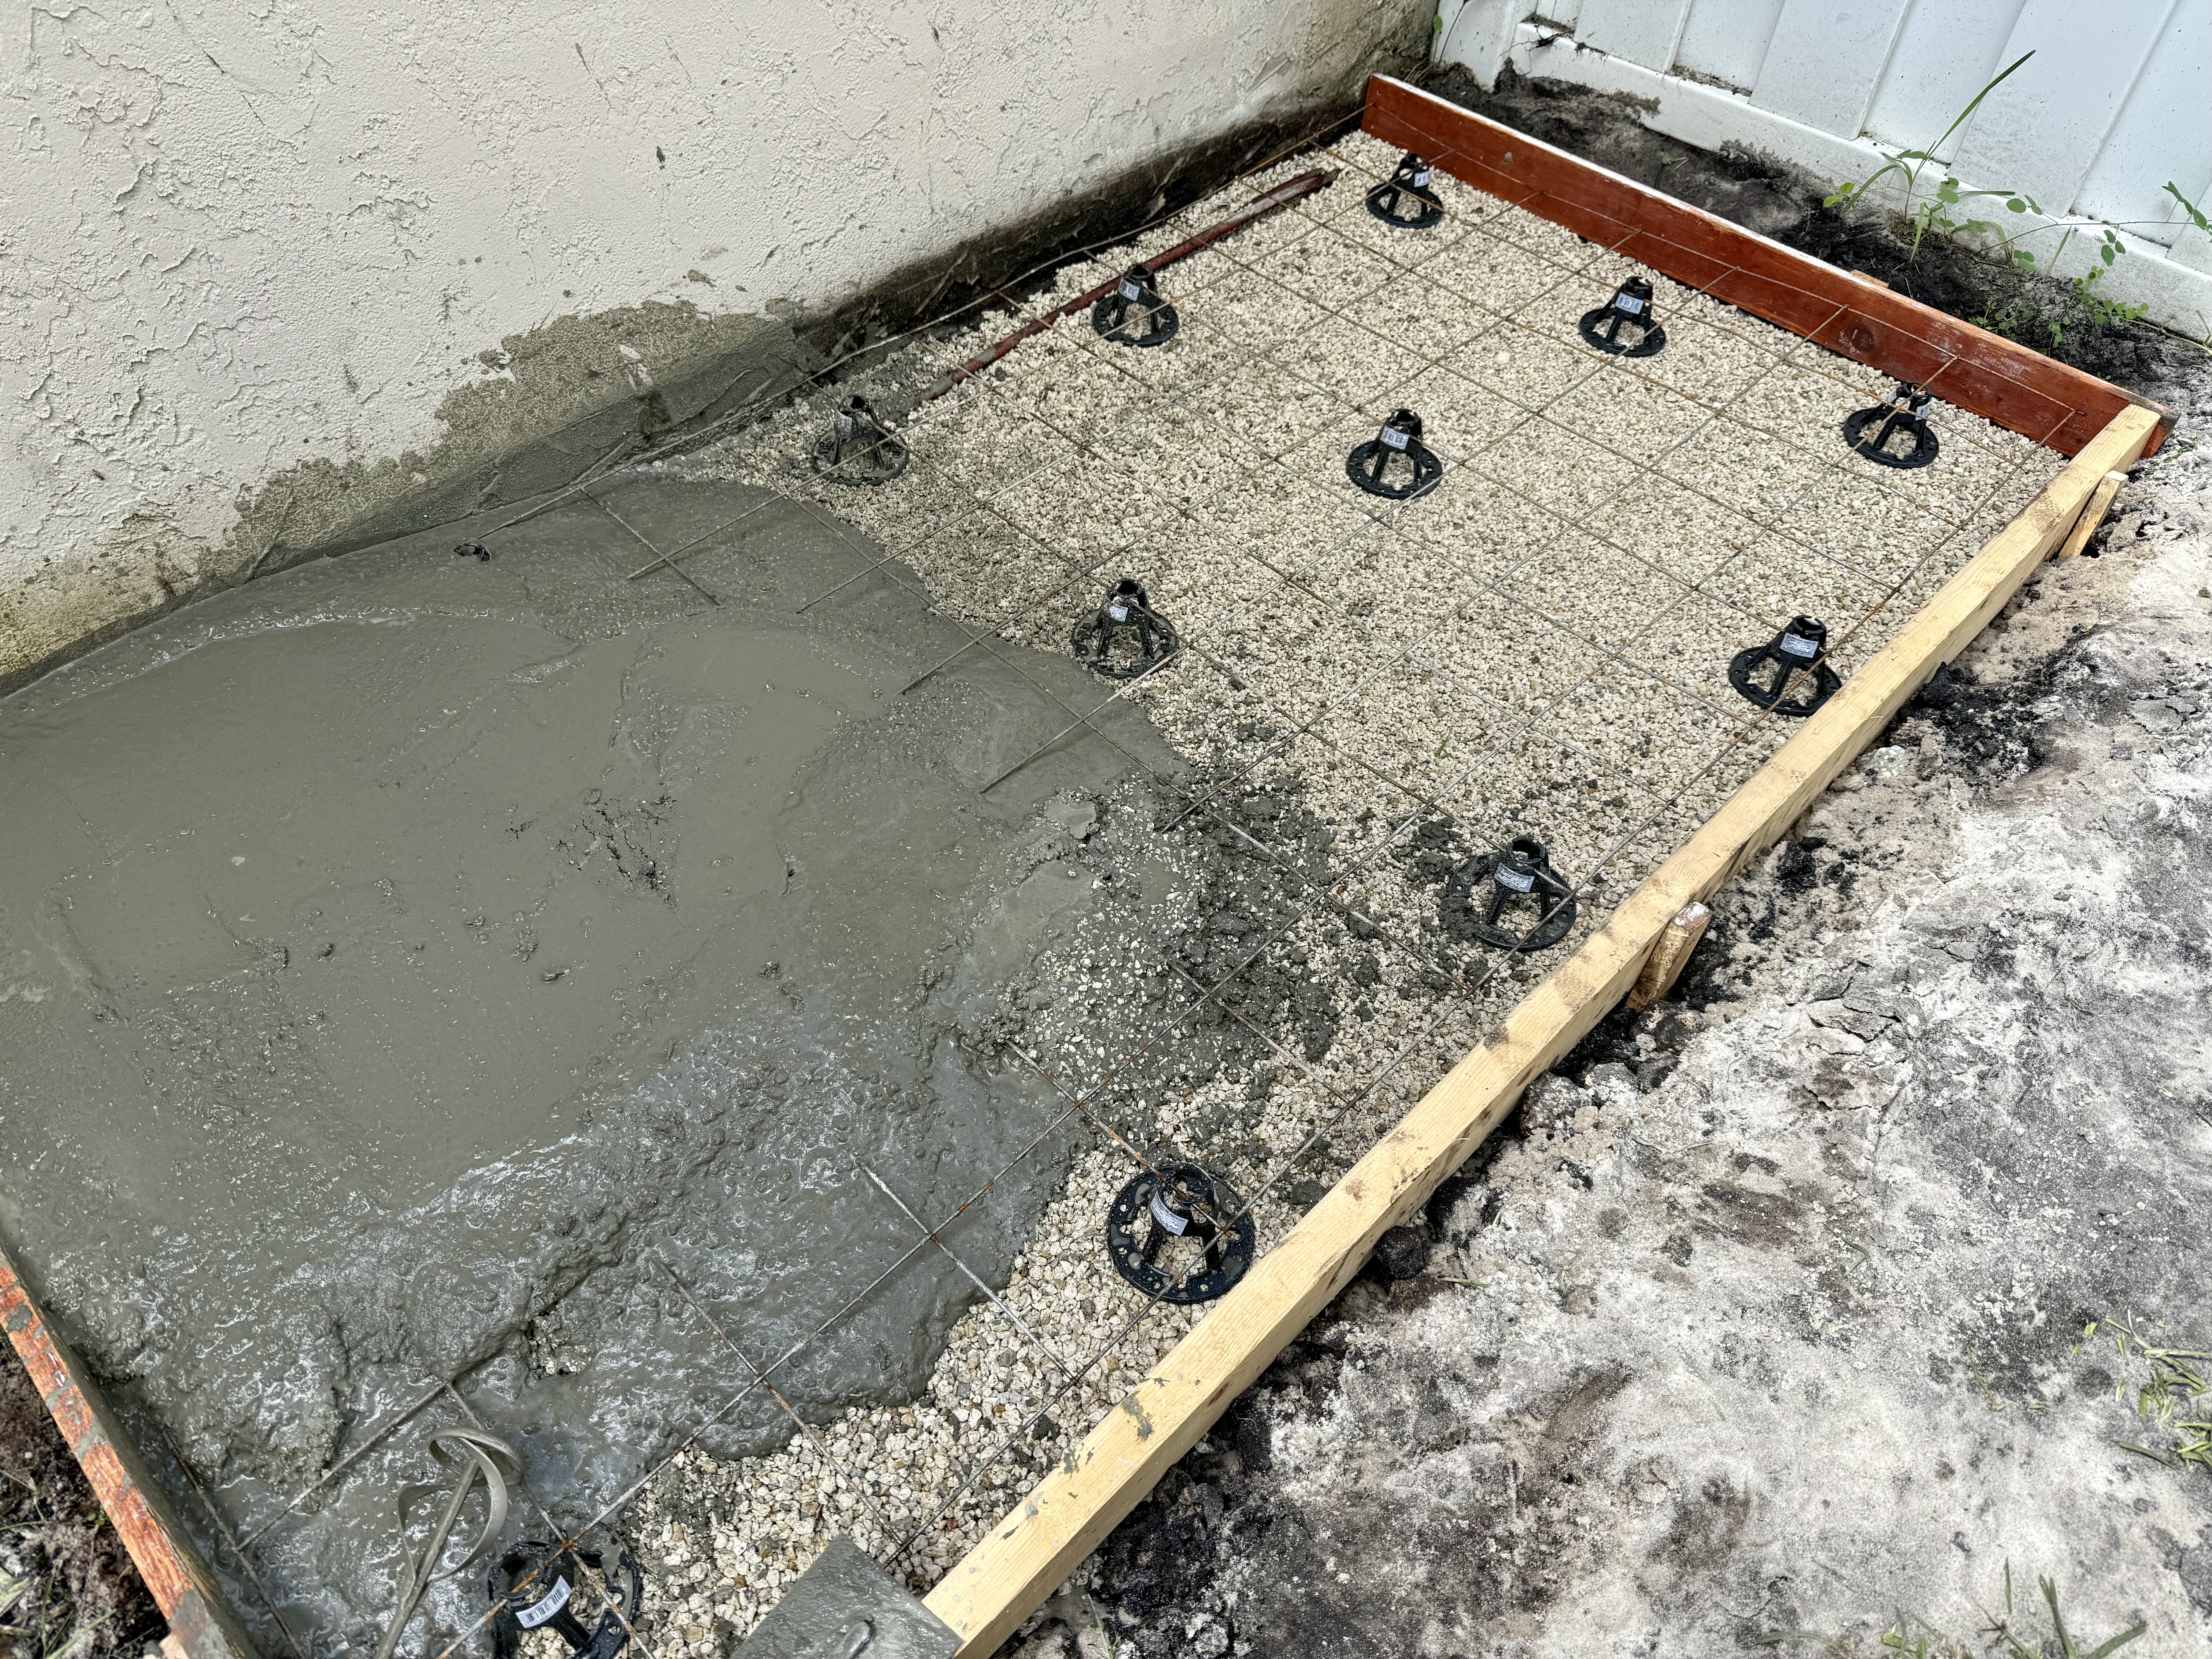
A concrete form is just a temporary wood frame that holds the wet concrete in shape while it cures. I cut two 2x4s to 7 feet and two to 3.5 feet, screwed them together at the corners, and staked them into the ground level. Level matters here — I used a standard 4-foot level and checked it twice in both directions.
I also excavated about 7 inches of soil from the pour area — 3 inches for the gravel base, 4 inches for the concrete. This is the part most YouTube tutorials rush past. The ground prep is what keeps your slab from cracking and sinking later.
Step 2 — Gravel Base and Compaction
I spread 5 bags of 50 lb gravel evenly across the bottom of the form — that's 250 lbs of material for a 24.5 square foot area, which works out to a roughly 2.5–3 inch compacted base. I tamped it down with a hand tamper until it was firm and level. No fancy equipment. Just time and effort.

Heavy Duty Hand Tamper
A 10×10 inch tamper head is the right size for a small slab like this — wide enough to cover ground fast, light enough to use for 45 minutes without wrecking your shoulders. I went over the gravel base in overlapping passes until it stopped sinking underfoot. Solid, even compaction here is what prevents the slab from settling unevenly later. Don't skip this step and don't underestimate how many passes it takes.
View on AmazonStep 3 — Wire Mesh and Rebar Chairs
The wire mesh is what keeps the slab from cracking into pieces if it does crack. It's not about preventing all cracking — concrete always cracks eventually. It's about keeping the pieces together and maintaining structural integrity.
I got lucky at Lowe's — they had wire mesh pre-cut to almost exactly 3.5×7 ft. I didn't have to do anything to it except place it. The rebar chairs are what elevate the mesh off the gravel so it ends up in the middle of the slab, not resting on the bottom. I used 18 chairs arranged in a 3×6 grid pattern, roughly one every 16 inches in each direction.
Important: the chairs snap onto the mesh wire and hold it steady. Once the mesh is chaired up, walk on it gently — it's stable enough but not a dance floor. I snapped a few chairs in by hand and it went quickly.
Step 4 — Mixing the Concrete
This is the part I underestimated most. I thought: it's just mixing bags in a bucket. Wrong. Twenty-four 50 lb bags is 1,200 pounds of material. You cannot mix that with a hoe in a wheelbarrow in time to pour it before it starts setting — not in Florida heat, not on your own.
The mud mixer attachment for a heavy-duty drill changed the calculus. I mixed one bag at a time in a 5-gallon bucket. Don't try two 50 lb bags in one bucket — it's impossible. You run out of room the moment the water hits and spend more time chasing concrete off the floor than actually mixing. Bag by bag is the only way. Each bag took about 90 seconds to reach the right consistency — thick enough to hold shape but workable enough to pour and spread. I worked in sets of 4–5 bags before pouring each section of the form.

Mud Mixer Drill Attachment
This is the single tool that made the job possible. You need a heavy-duty drill (mine is a corded 1/2 inch), but once you have that, this mixer handles concrete, mortar, or thinset with no trouble. At 24 bags of 50 lb mix, I would not have made it without it. Mixing by hand in that heat would have been a full-day job — and the concrete wouldn't have waited. Get this before you buy the bags.
View on AmazonWater ratio is everything. Too much water and your concrete is weak — it might look easier to pour, but you've compromised the strength. Quikrete High Strength (5000 PSI when cured) calls for roughly 3 quarts of water per 50 lb bag. I measured the first few and then went by feel — it should look like thick oatmeal, not soup.
Step 5 — Pouring, Screeding, and Leveling
I poured from one end and worked my way toward the other. After pouring, I spread the concrete with a flat shovel, then used one of my 2x4 boards as a screed — dragging it across the top of the form in a back-and-forth sawing motion to level the surface. This took two passes. The first pass gets it close; the second pass smooths out the high and low spots.
Work fast during this phase. Once you've screeded, you want to move immediately to edging before the concrete starts to stiffen.
Step 6 — Edging and Finishing
The edger rounds and compresses the perimeter of the slab, which strengthens the edges and gives you a clean professional look. You run it between the concrete and the inside face of the form. The key is timing — wait until the bleed water (the shiny water that rises to the surface) has mostly evaporated. If you edge too early, the impression fills back in. If you wait too long, the concrete is too stiff to work.

Marshalltown Concrete Edger with Handle
A quality edger makes a visible difference. The Marshalltown has curved ends so you can rock it slightly as you move along the edge rather than dragging flat. This reduces gouging at the start and end of each stroke. For a first-timer, the long handle version is worth it — you get more control and you don't have to crouch over the slab the whole time.
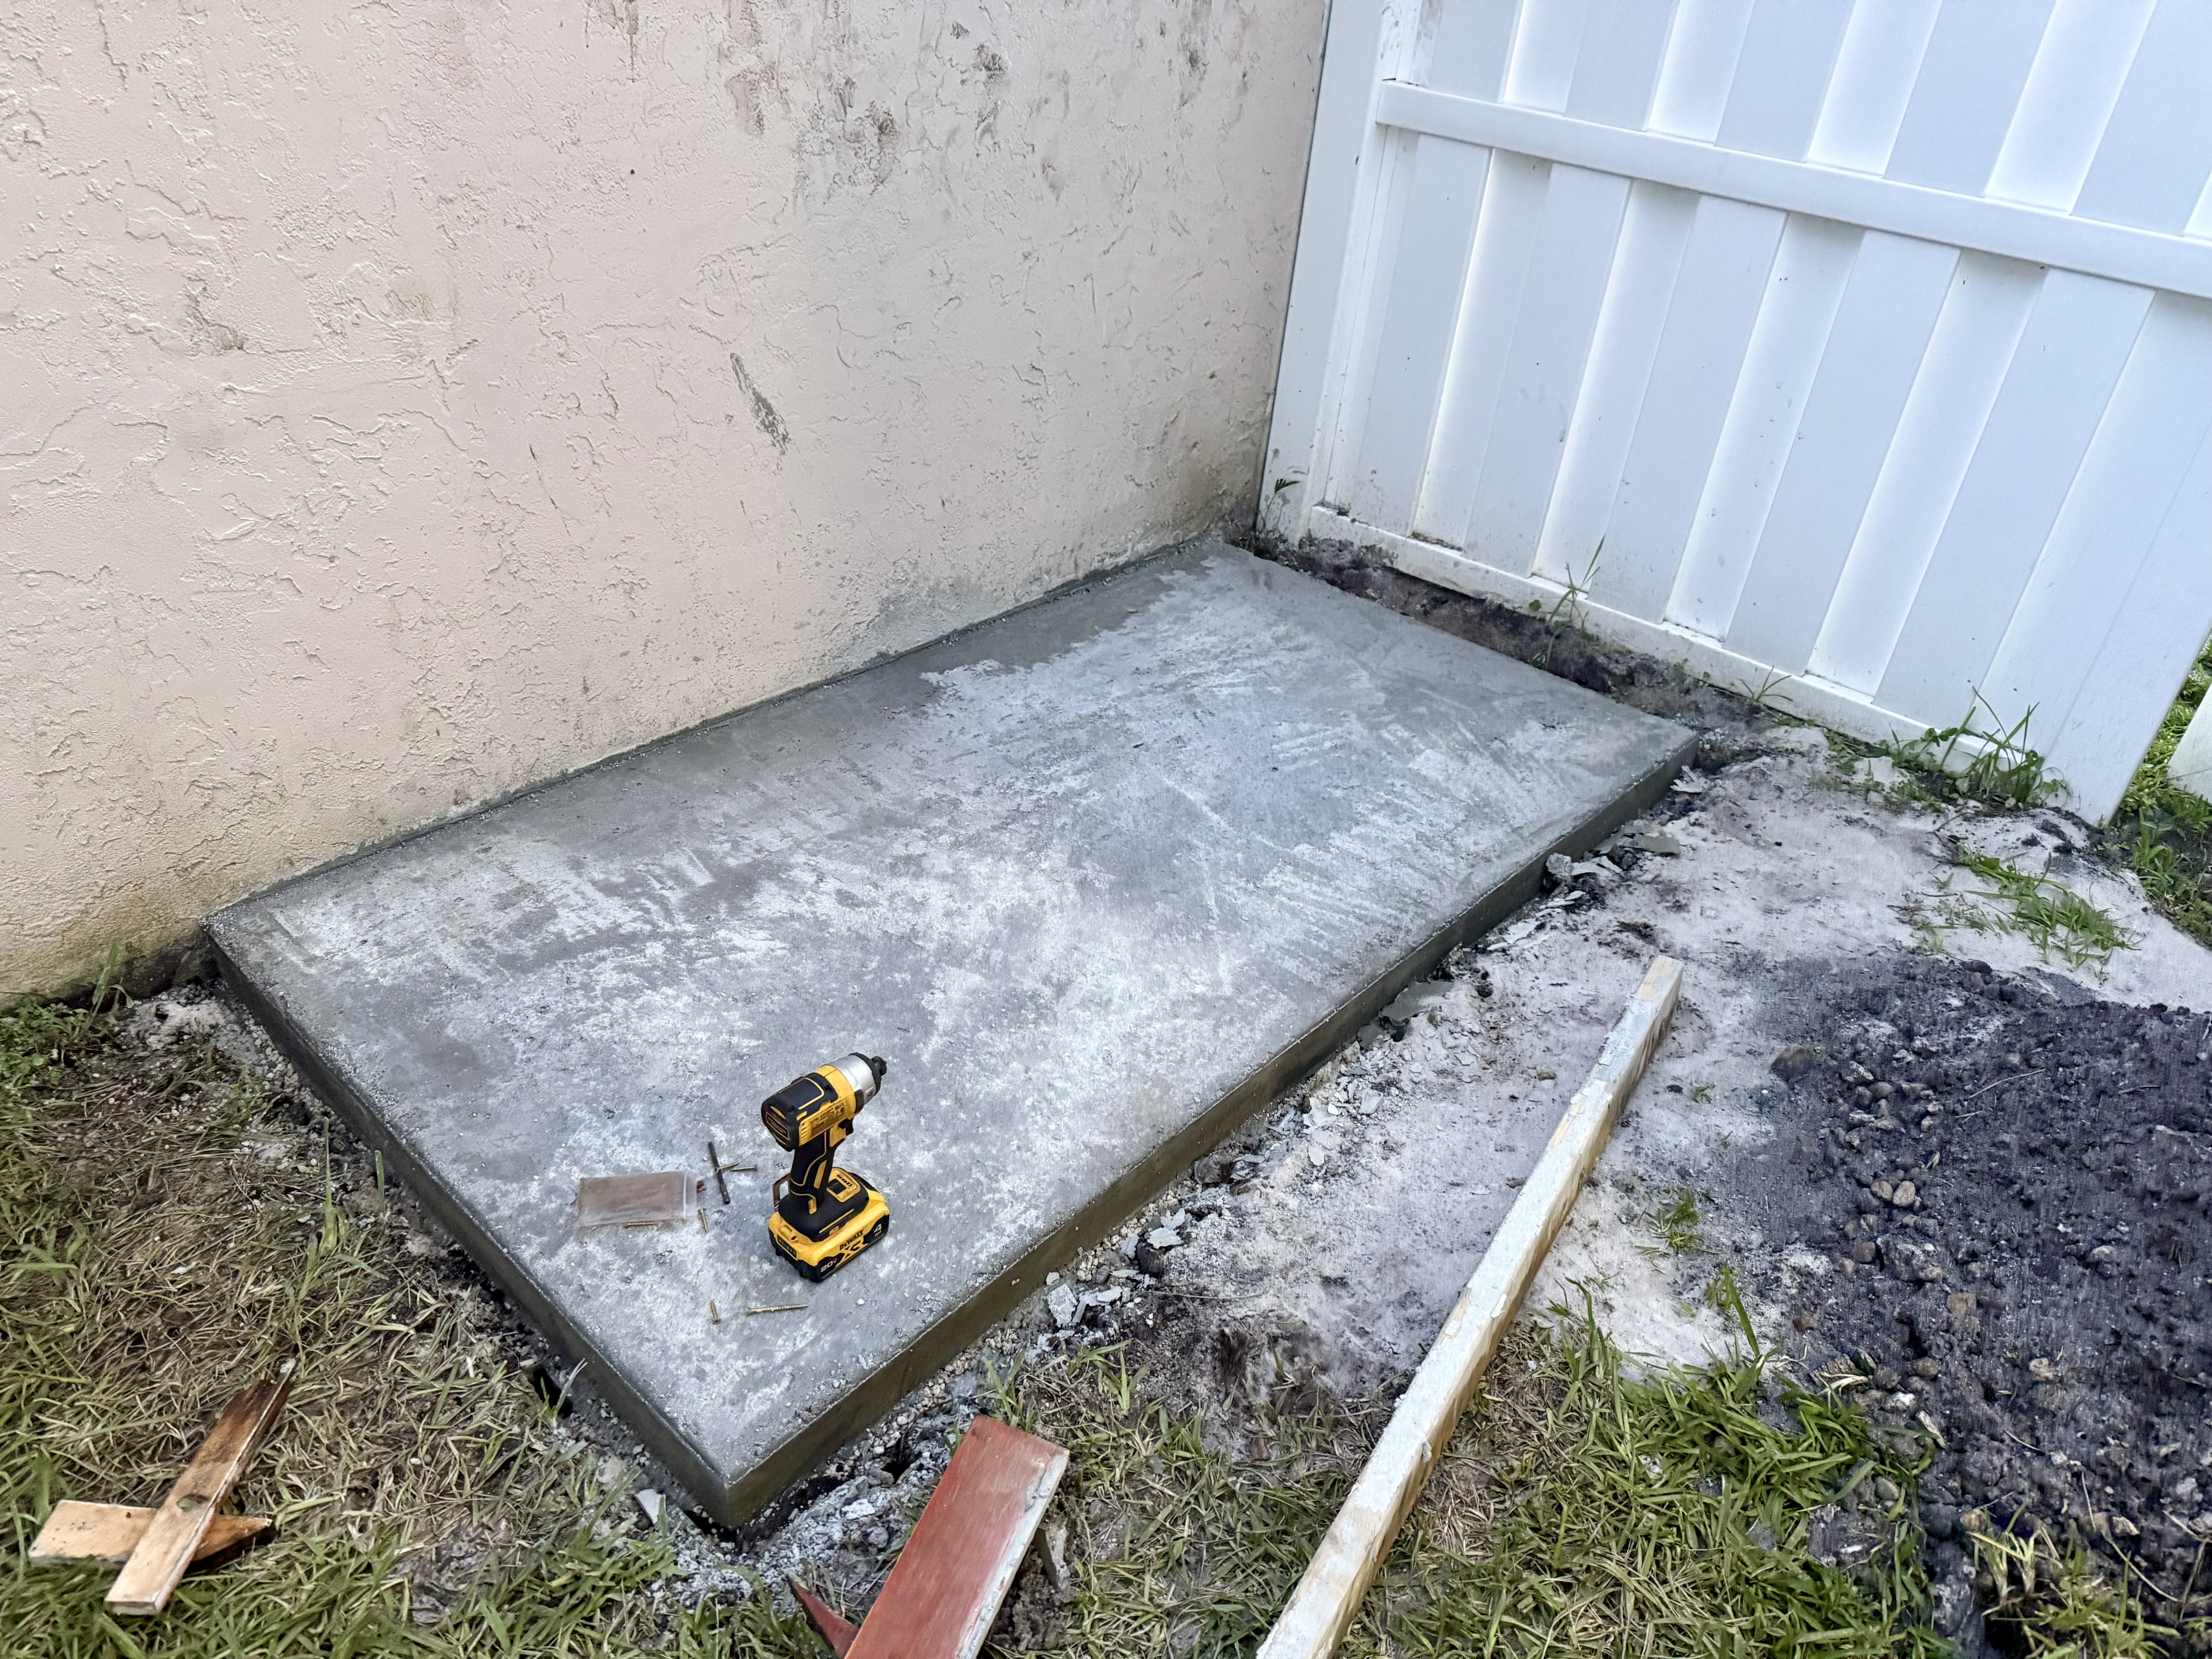
View on AmazonAfter edging, I finished the surface with a steel trowel. The goal here is to close the surface — press and smooth until you see a slight sheen. I went over it twice, letting the concrete firm up between passes. The second pass is where you get the smooth finish. Don't overwork it; you'll start pulling up aggregate.

Marshalltown Finishing Trowel
Same brand as the edger for a reason. Marshalltown is what actual masons use, and the quality shows in how the blade holds an edge and flexes slightly for a better feel. For a small slab, a 4-inch trowel is plenty. You don't need the wide 14-inch pro version — that's for large flatwork where you need to cover ground fast. This size gives you more control on a first pour.
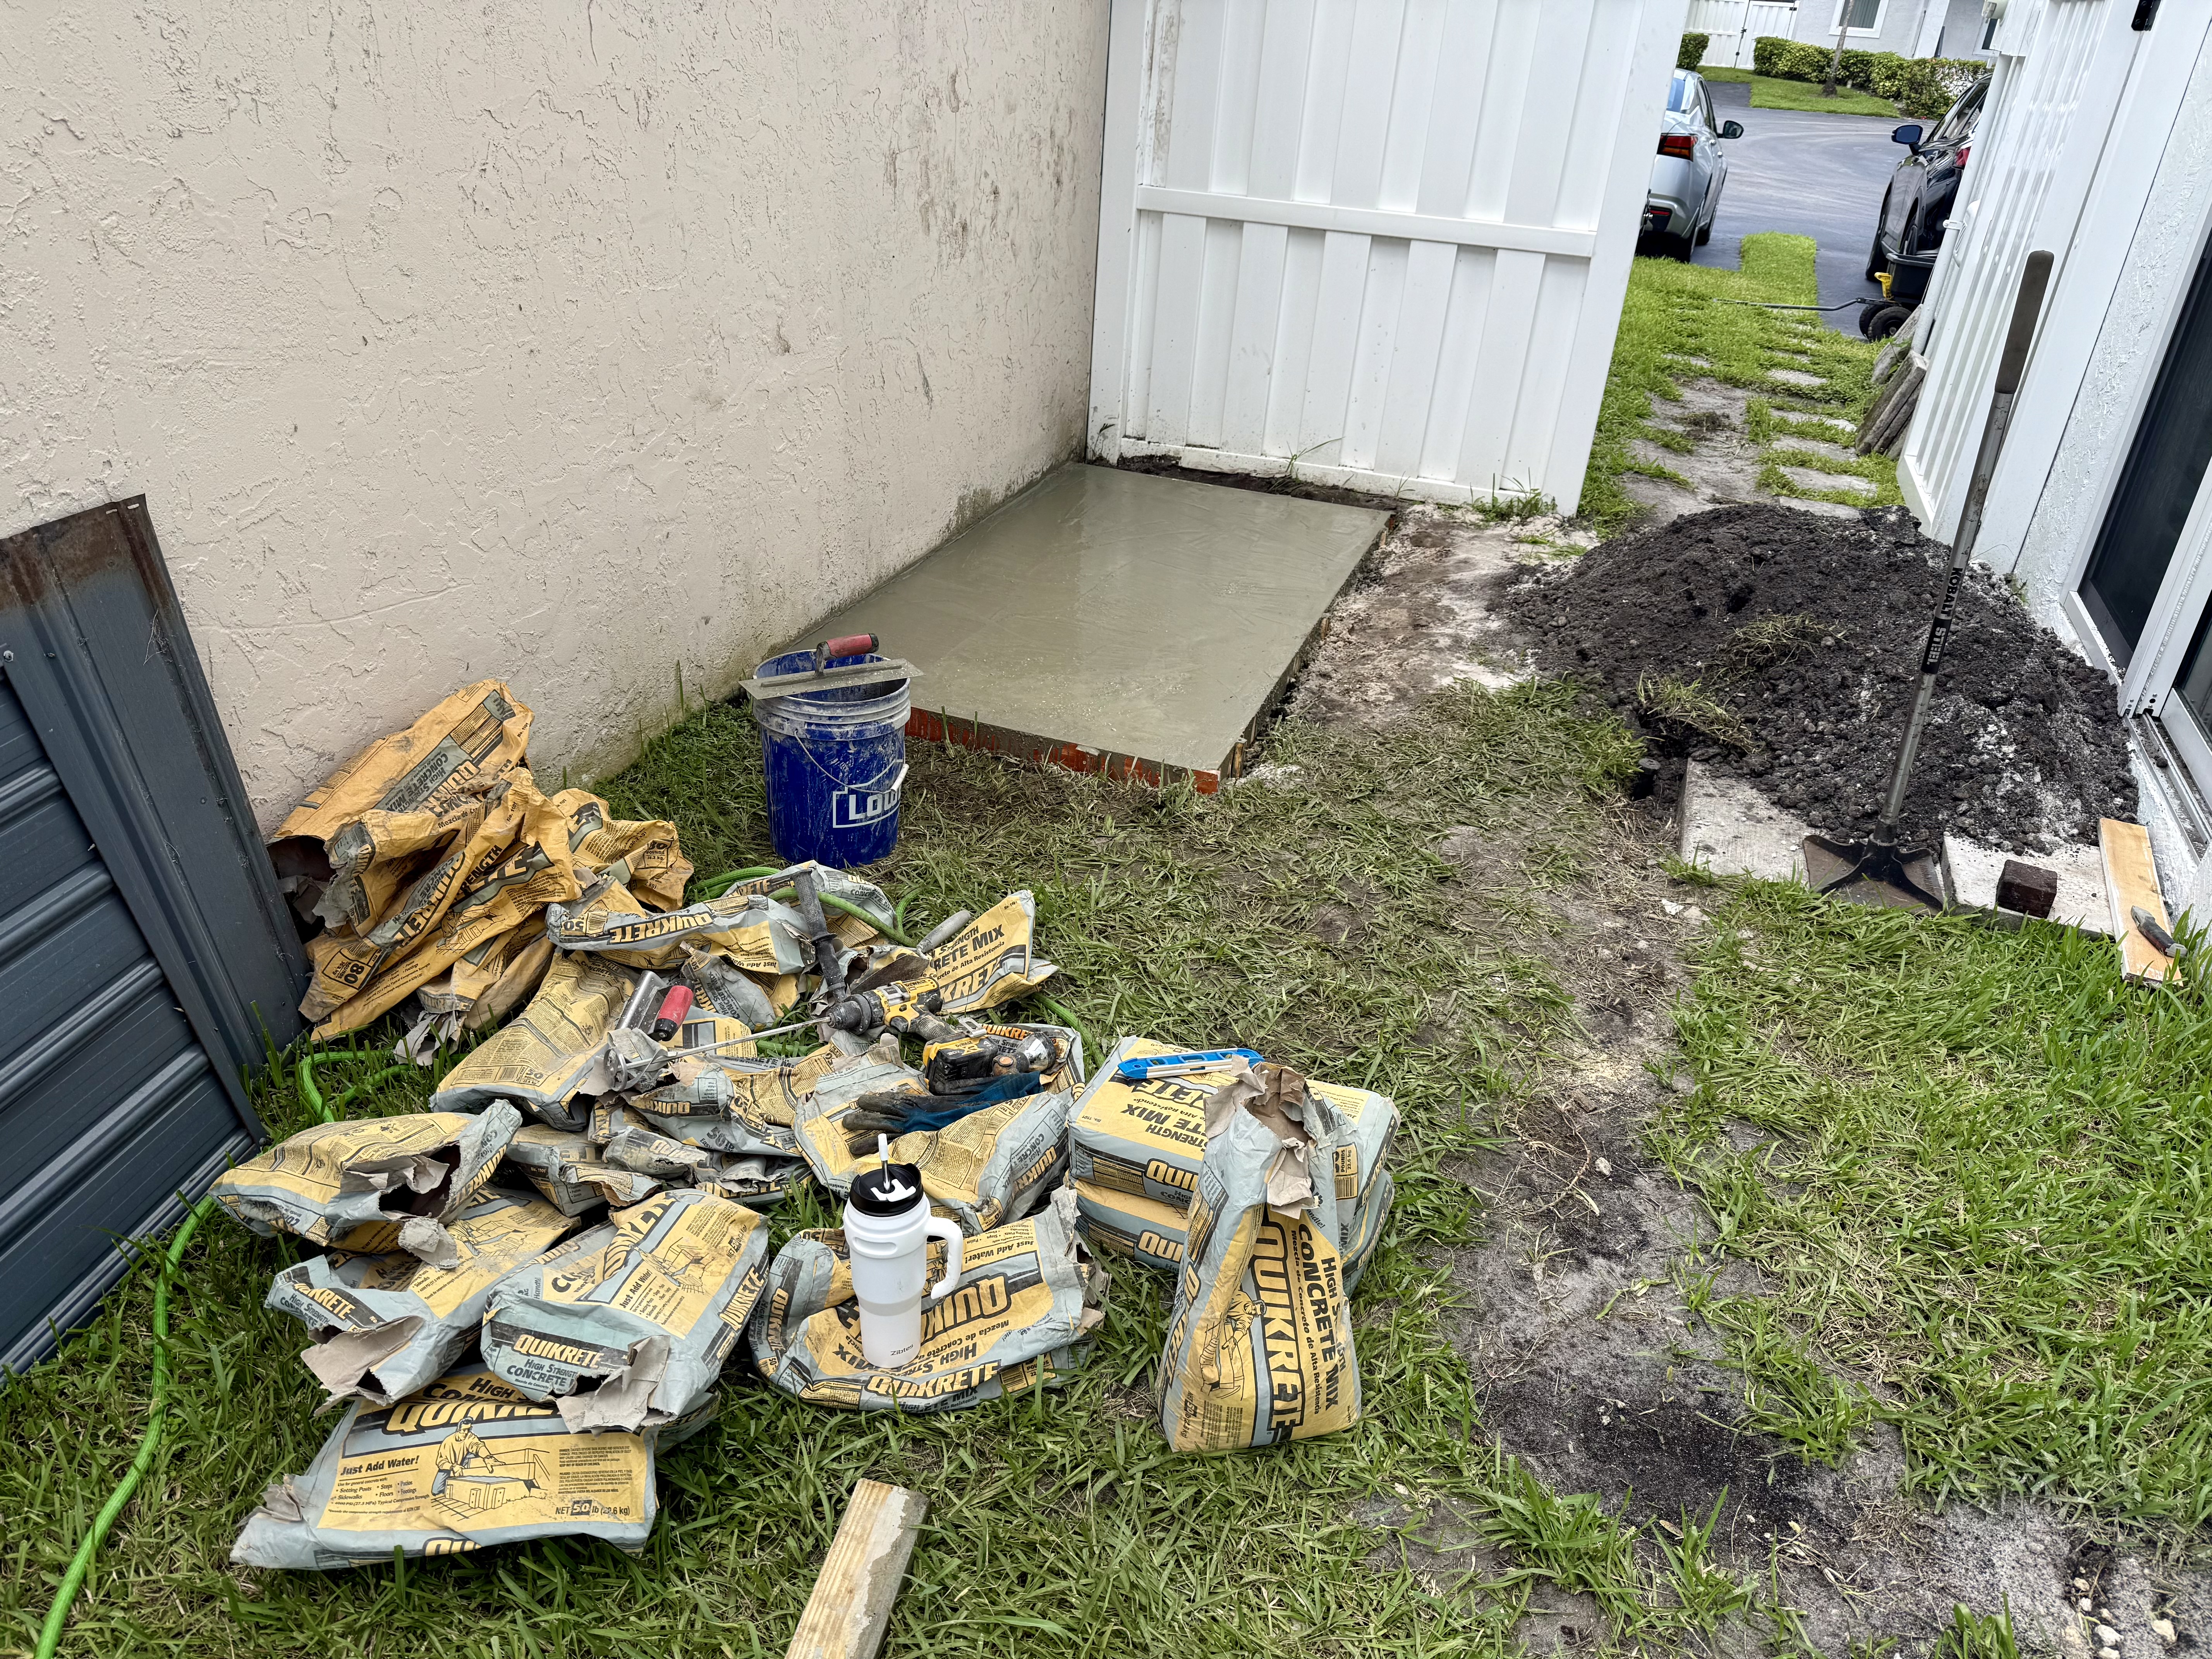
View on AmazonStep 7 — Curing
Once the surface was finished, I covered it with plastic sheeting and weighted the edges. Concrete doesn't actually "dry" — it cures through a chemical process called hydration, and keeping it moist helps it reach full strength. I misted the surface lightly twice a day for three days before pulling the form boards.
The slab was walkable in about 12 hours. I waited 72 hours before placing any weight on it. That shed had been staring at me from the driveway the entire time. Three days after the pour, I finally started assembling it. The slab was solid — and my anxiety was finally dealt with.
What I'd Do Differently
If I did this again: I'd rent a paddle mixer instead of using a drill attachment. The drill got the job done, but it was running hot by bag 18. A dedicated mixer would have been faster and easier on the equipment. For a slab this size, a rental runs about $40–$60 for a half-day. Worth it if you're not buying a mud mixer for regular use.
I'd also start earlier — 6am instead of 7am. Every 30 minutes matters when you're working in South Florida summer heat and racing the concrete's open time.
The slab came out level, solid, and crack-free. The shed has been sitting on it for months. First time doing concrete. Definitely not the last.
The Short Version
| Phase | Time Taken | Notes |
|---|---|---|
| Excavation & form build | ~1.5 hrs | Most important phase — get level right here |
| Gravel base + tamping | ~45 min | Wet gravel before tamping |
| Mesh + rebar chairs | ~20 min | Pre-cut mesh from Lowe's was a lifesaver |
| Mixing + pouring | ~2.5 hrs | 24 bags × 50 lb — mud mixer essential |
| Screeding + edging + finishing | ~1 hr | Watch for bleed water before edging |
| Curing | 72 hrs min | Mist and cover; don't rush |
Total working time: roughly 6 hours of active labor, one person, no concrete experience. Cost was mostly materials — concrete, gravel, wood for the form, and the tools. The tools are reusable, so the real cost for future pours goes way down.